Monday, November 2, 2009

fancy girly gloves in ten minutes

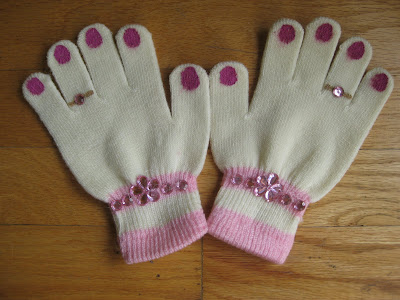
Last spring I got a great deal on a two-pack of stretchy gloves from Target (25 cents!). One pair was pink with colorful hearts. The second pair was cream with pink stripes at the wrist.

This morning was chilly. So I pulled out the gloves for my girls. But when they saw that one pair had hearts and the other was plain, the bickering began. Of course they both wanted the fancier gloves.

They got plain brown gloves today. (I'm so mean.)

So while they were at school, I pulled out the fabric paint and painted fingernails on the fingers of the plain gloves. I used gold paint to make rings on the ring-fingers. I added pink jewels with the glue gun.

The painting and gluing took about ten minutes. Drying time was about an hour.

Voila!

Fancy!

Now I am wondering if I have just caused another fight.

Thursday, October 22, 2009

Christmas project


I found this little beauty at a thrift shop for cheap. It is a bisque-fired ceramic carousel horse that has been painted hideously with glitter paint.
I am going to make it pretty again.
This horse is going to be a Christmas present, so I hid it away in the basement laundry room. I have been painting it while Alli and Ruby are at school and hiding it before they come home. That worked well for a few weeks until they went exploring in the dark, creepy laundry room.
They were so delighted to discover the horse! I sort of made up a story... like, "I think that belongs to the landlord. We better not mess with it." or something like that.
I hope they will forgive my fib when Christmas comes.
I will post another picture when the horse is done.

Friday, August 14, 2009

the wedding

My baby sister got married last weekend! She is the ninth kid in our family to tie the knot, so my family knows a thing or two about throwing a little party... for cheap.
We transformed the church gym with paper lanterns lit with battery-powered LEDs. The lanterns were purchased online, and we saved the packaging so they can be resold on Ebay.
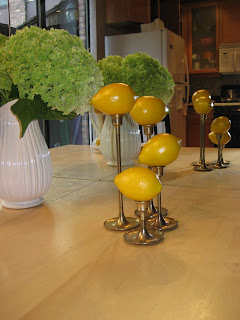
For flowers, we used hydrangeas from a friend's yard. The flowers were free (but they looked expensive). We also used greenery from hostas and some wildflowers in the arrangements. About half of the tables had hydrangeas, the other tables had arrangements of lemons and limes. The fruits were ordered by the case (and after the reception we made lots of lemonade!). We used a variety of pitchers, vases, candlesticks, and bowls for all of the arrangements, so each table was unique... but the whole room looked pulled-together and cohesive. Very chic and elegant... and inexpensive.
Unfortunately, in all the hustle and bustle of the reception, I forgot to get good pictures of the table centerpieces. These are the best pictures I've got.
My brother Dan made the cake and decorated it. Delicious. And gorgeous.
The groom's family brought gorgeous leis for the bride and groom and for all of the bride's family (that's a lot of flowers!). I wore a pretty magenta lei (that June pulled apart). I loved all of the flowers on the tables and people.
Some of the food was ordered from a friend's restaurant... and he did it for his cost. Some food was prepared by family and friends. It all came together, and 200 people were fed.

Only one more Mars wedding to go... and it better be in a few years, Ben!
Monday, August 3, 2009

lemon and lime


My youngest sister is getting married this week! I am doing the centerpieces and decorations for the reception, so I have been playing with her theme lately: lemon and lime. It is such a fun theme to work with!

My mom's theme: inexpensive! So we are using seasonal flowers like hydrangeas (from our friend's garden) and Queen Anne's lace, daisies, etc. (whatever we find growing on the side of the road). We are also ordering cases of fresh lemons and limes.

The table centerpieces will be arrangements of hydrangeas and wildflowers and collections of lemons and limes in eclectic dishes. The bride wants an elegant yet whimsical feel. Quaint with a little quirk. We are using an assortment of vases and dishes... some wedding gifts that we haven't used much and other pieces from the thrift store. The colors of the lemons and limes, flowers, and dishes will unify all the tables, but each table will be unique.

Stay tuned for pictures of the wedding and reception!

Thursday, June 4, 2009

From a shirt to a dress...


I joined a little blog sewing group and made this dress for Ruby!  The dress started out as a men's shirt.  I would have used one of Andy's shirts , but they were all washed and ironed, hanging neatly in the closet... so I went to the thrift store and picked out a shirt.  Orange gingham.  It was big, so there was plenty of leftover fabric to make the headband-hat-thingy.  Also, instead of the elastic waistband, I made a tie waistband.  Not only does it tie, but it also looks like a tie (necktie)... but it is made of washable cotton.  I carefully removed the shirt pocket and sewed it onto the skirt of the dress.  Ruby likes to fill it with treasures.  Ruby loves this dress and calls it her "sundress." 
Click here for the tutorial!

This is the second time I have tried to get good pictures of her in the dress.  She is jsut always on the move!  Next time!


no sweat... actually, no stink

I made something today.  Deodorant. 

I haven't used antiperspirant in a long time.  Like two years or something.  It is not very good for you.  And I don't like yellow pit stains in my shirts.  So, no antiperspirant for me.
Sure, I sweat.  But I don't stink.
I found a great recipe for homemade deodorant here

3 Tablespoons shea butter
3 Tablespoons baking soda
2 Tablespoons corn starch
2 Tablespoons cocoa butter
2 vitamin E oil gel caps (puncture and squeeze out the oil)
Essential Oil (I used ylang yang and orange)

I switched to this deodorant last fall.  I love it.  The ingredients are simple and it works so well!  When I say it works well, I mean you may sweat buckets, but you will not stink!  And your shirt pits will not turn yellow.
Here is a little variation on that recipe, you can find moisturizers (usually "body butter" or something thick like that) made mostly of shea and cocoa butter that are already scented with essential oils (read the ingredients), and so I use about 5 tablespoons of that.  Mix the Vitamin E oil to lotion.  And then just add the baking soda and corn starch to that.  I like Bath & Body Works body butters and massage butters for a quick deodorant.

Seriously, this stuff works well.  Fresh pits all day.  And night!

Not very crafty... but homemade.  And healthy.


Sunday, May 17, 2009

a skirt from Grandma's fabric

I had a lovely neighbor all of my growing-up years in Ohio.  We called her "Grandma Wolf."  (Wolf was her last name.)  Grandma Wolf loved to sew.  She made most of her own clothes... crisp pants with cool cotton blouses... koulots and matching tops.  And she wore all of her homemade creations with white knee-high stockings and white shoes.

Grandma could do it all: buttonholes, zippers, elastic, collars, piping, trims.  She generously gave us lots of leftover fabric.   She had a huge garden.  She canned things.  Visiting her was a treat... and usually she gave us her unique homemade cookies or some "penny candy."  I wish now that I could go back in time and take sewing lessons from her.  She would have liked that.  Gardening lessons too.  She knew so much, and I wasn't really interested then.  Grandma passed away a few years ago. 

When I went home for Easter this year, I spotted some fabric at my parents' home... vintage fabric remnants from Grandma Wolf!  What a treasure!

This week, I made a skirt for myself with the fabric from Grandma.  I kept it simple... A-line with a zipper and hook closures.  With the scraps I sewed a flower for my hair.  I love the bright, graphic floral pattern... so summery and bright.  Vintage, but fresh.  As I worked on this project, I thought of my sweet neighbor and I wondered what she would think of my efforts.


Not as tidy as Grandma would have done, but a solid first step.


Wednesday, May 13, 2009

sushi baby


Another applique shirt!  This is for a baby with sophisticated taste buds... sushi with ginger and wasabi!  This kimono-style t-shirt would be cute paired with black leggings and Trumpette socks.  Yum.

yoga baby shirts


Here are some bodysuits I appliqued for a baby shower gift.  The momma is into yoga, so I made babies doing yoga poses.  I also made a baby yoga mat with tag fringe to go with this. 

custom glasses

My sister stayed with us this winter to help with the new baby.  It was wonderful.  But she and I kept getting our glasses mixed up.  Not that I minded too much, but I like to use one glass all day... less dishes to do.  And I like to keep my germs to myself.

So here is our solution... a simple project for your glass tumblers.

First, cut shapes from contact paper to make stencils.  Paper punches, QuicKutz, or even an Xacto knife work well for this.  The shapes should be unique, so every glass is different... so you can easily tell them apart.

Make sure the glass bottoms are very clean, and adhere the stencils to the bottoms.

Next, carefully paint some glass etching paste over the design.  Wait five minutes and rinse well (or whatever the package instructions say).  Peel off the contact paper stencils, and voila!

Now you can tell which glass is yours by its unique design... and your glasses will still match each other when set at the table.

And every time you take a sip, you will smile at how clever you are.  We have also found these to be great conversation pieces.

I used several images, but monograms, punctation, or geometric designs would work too.

This makes a great semi-homemade gift!  A 12-pack of glasses at Target is about $6.  The etching paste is about $5 (the small bottle will go a long way!).  And if you don't have lots of paper punches, come over and borrow mine.

Tuesday, March 17, 2009

retro apron


This apron is part of a very late Christmas gift.  I appliqued the orange slice with fabric, double-sided iron-on backing, and machine stitching. 
Applique-ing was so much fun.  I might have to make some more projects with this.
Stay tuned.

Tuesday, March 10, 2009

creative baby gifts

I am blessed with some very talented and generous friends who have made some darling gifts for June.

My sister-in-law Sarah knitted this winter hat for June (and another coordinating one too... a Chicago girl can't have too  many!).  Obviously June loves it!  I love it too.  Knitting is not (yet?) one of my talents, so it is wonderful to have a homemade knit hat.


My friend Mo made these onesies with fabric, double-sided iron-on backing, and simple machine stitching.  I can't wait for June to grow into these.  I think the writing over the elephant says "awesome" or something like that.


The fabulously talented Marjorie crocheted the gorgeous edging on this blanket.  It is such a beautiful touch on a simple blanket.


My dear friend Stephanie made this sweet set: bibs, burp cloths, and onesie.  I love the hand stitching around the monogram and heart!  And how baby-sophisticated to have a burp cloth that matches the outfit!


My mother-in-law made June's blessing gown.  You can see it here.

My lovely friend Kris Tina made a baby cozy for June.  That's right.  A baby cozy.  A cocoon of fuzziness.  Here is June snoozing away in her cozy cocoon.  Heavenly.


I love seeing the brilliant projects my friends do... and it is wonderful to be on the receiving end of their creativity! 


Wednesday, March 4, 2009

pants for daddy's girl


I have a thing for 1) a good challenge, 2) recycling, 3) creating something unique, 4) outfitting my daughters... and this project fulfilled all those things. 

I used the shirt sleeves to make pant legs.  I sewed the shirt pocket onto the back of the pants.  I am not very great at sewing waistbands, so I used the wasteband from a pair of Ruby's shorts (they used to be pants, but the knees wore out so I made them into shorts, then the bum got worn out.... this is recycling at its best, right?).  I cut the waistband off the shorts with about 2 inches of fabric below it.  I attached the waistband to the sleeve pants.  Not too difficult.


What do you think?  Ruby likes to wear this with her "Daddy's Sweetheart" shirt.

Thursday, January 29, 2009

Birthday banner


At our house, there are four January birthdays!  So I like to decorate the house a little extra special.  This year I made a fabric birthday banner.  We used it all month, and I will pull it out in June... and again and again over the years.
I stuck with a gender-neutral rainbow palette.  I used bright, basic colors, but you could do this in any color theme.

To do this project you will need:
28 rectangles of fabric (6-1/2 inches by 8-1/2 inches)*
felt scraps... enough to cut out 26 letters
10 feet or more of twill binding or thick bias tape (or doubled up ribbon)
2 curtain rings with clips
a sewing machine that can do a straight stitch

*This is a great use for your collection of fat quarters and fabric remnants!

Iron all of the wrinkles and folds out of the fabric rectangles. 
Cut out the letters for HAPPY BIRTHDAY two times (for front and back).  I cut out the letters by hand, so I went for the multi-font look... unity in the variety.  The letters should be about 5 inches tall.  If you are making multi-colored letters, you may want to lay out your rectangles so you can coordinate your letters with their backgrounds.
Sew one letter onto each rectangle... there will be two blank rectangles.  Just a simple, straight stitch will do.
This is the tricky part... lay out the first set of letters spelling HAPPY BIRTHDAY (make sure to leave a blank rectangle between words).  Lay out the second set of letters below in this order YADHTRIB YPPAH (don't forget the blank rectangle in between words).  They should line up like this (I used the @ to show the blank space):

H A P P Y @ B I R T H D A Y
Y A D H T R I B @ Y P P A H

Sew the H rectangle to the Y rectangle with letters facing in, then flip inside out.  Sew the A to the A, letters facing in, flip inside out.  Repeat with remaining letters.  You will end up with HAPPY BIRTHDAY on both sides of your flags. 
Line up your flags with about 2 inches between each one.  Pin them in place on the bias tape or ribbon.    Double check to be sure your letters are in the right order on both sides.  Sew the flags in place with a straight stitch.
At each end of the ribbon or bias tape, sew a curtain ring (this makes hanging the banner much easier).
Hang your project and enjoy!


Sunday, January 11, 2009

creative


Please be patient... I have been working on a very creative project (with help from Andy)!  Her name is June Emilia.  She is beautiful!  As with any good creative work, she has caused a lot of messes and taken all my energy... but totally worth it!
Stay tuned for more crafty, creative posts, but in the meantime, enjoy a few of Alli's projects...