Tuesday, February 2, 2016

Thin Mint Rice Squares

This recipe is inspired by Thin Mint Girl Scout cookies (which I used to love).  But this version is gluten free and vegan and takes just a few minutes to make!  And once you taste this head to head with the cookie, you may never order thin mints again.  (Sorry Girl Scouts.)  Use quality cocoa, chocolate chips, and peppermint oil for the best flavor.
100 Calorie Thin Mint Rice Squares
1 tsp coconut oil
2 Tbsp semi sweet chocolate chips (or chopped up chocolate bar... I used Kirkland Signature chocolate chips)
2 drops peppermint oil (use a good essential oil for best flavor... I used DoTerra Peppermint oil)
1 T powdered sugar
1 heaping T cocoa powder (I love Rodelle cocoa)
1- 1/2 cups rice squares cereal (ie- Chex, but I used Aldi brand rice squares)

In a microwave safe bowl, melt coconut oil and chocolate chips together (about 30 seconds at a time until melted).  Add 2 drops of peppermint oil and mix well.  Add 1-1/2 cups of rice square cereal and mix gently until the cereal is evenly coated with the melted chocolate mixture.  Add the powdered sugar and the cocoa powder.  Mix gently until the cereal is evenly coated.

Nutrition information: If you divide it up into three servings, each has about 100 calories, 3 grams of fat, and 1 gram of fiber.  Not bad.

I prefer my chocolate dark, rich, and not too sweet.  You can tweak this recipe's sugar/cocoa powder ratio if you like it sweeter: 1 T cocoa powder and 1 heaping T powdered sugar.  This will add to the calories slightly.

Enjoy!

Tuesday, April 8, 2014

Spray paint season!

I must admit, with the weather warming up, I am getting excited for spray paint season!
Who's with me?!

I have a bunch of spray painting projects just waiting for the 70 degree weather.
Bring it on!

Until then, here is my latest project...
(We make cute babies.)


And speaking of spring... we got to play with lambs!  More pictures and the story here.
  (If this picture doesn't thaw out your winter chills, nothing will!)

Saturday, February 22, 2014

Baby bassinet remix

One week (or so) until baby comes... hopefully sooner.
We got rid of baby stuff long ago.  So we are starting over with the gear.
The thing is, I already know how quickly babies grow out of stuff, and that we are probably done having babies, so I didn't want to spend a fortune on equipment.
So I have been searching Craigslist.  (Yikes.)
I found a crib for $50 that sounded nice enough, new enough, and good enough (I made sure there were no recalls on the make/model).  It turns out a family from our elementary school was selling it... and for $50, I got the crib and they threw in this bassinet (it converts to a changing table) for free!  And they delivered it!!!
First, I washed every scrap of fabric on the bassinet.  There were lots of snaps, velcro and zippers, but it all came off.  Once it was washed and put back, it looked good as new... but really neutral...
and boring.
 And then I got an idea...

And then I got fabric...

I made long covers for the sides of the bassinet.  I cut strips of fabric about 6 inches wide, folded them over about 1/3 of the way down, so that both the right sides and back sides of the fabric strips showed (I like how the back side shows the pattern and colors, only softer... so sometimes I make the back side of fabric show on purpose), and then I ran a long stitch long the folded side.  Once I had the long stitch across, I gathered the fabric by pulling on the top thread... to make ruffles.  Lots of ruffles!  

I added a ruffle to the hood, and pinned a cute felted wool flower to the inside (for baby to look at) and onto the hood (for cuteness).

 I pinned a few felted wool flowers (I made a bunch of these for Valentines Day, these were leftovers) over the embroidered words on the organizer... much better.  And I stocked up the organizer thing with diapers, wipes, burp cloth, etc.

 Okay, now baby has a nice place to dream.  Doesn't it look cozy?
Ruby immediately pulled up a stool to check it out.  Ruby approved.


Anytime now, baby.

Friday, January 17, 2014

A Harry Potter Birthday Party... on the cheap

Alli turned ten this year... which is a big deal.  And she wanted a Harry Potter-themed birthday party.
First we checked out Pinterest.  There are some great ideas out there.  But I was trying to keep this party cheap, fun, and not too time-consuming.

To decorate, we gathered up stuff we already had... books, a bird cage, stuffed owl, round plastic glasses, a witch broom, a wand (stick), a witch hat.  Alli sewed a golden snitch out of felt.  (I spent $0 on this.)
Alli made a sign for the front porch that said, "Platform 9-3/4."  She just used a chalkboard and chalk.  It was cute.  I failed to take a picture of that.

We also hung a bunch of streamers.  I like to pick up packs of streamers at the local thrift shop.  They are super cheap that way.  I have a box in a closet with all colors of streamers.  It is a great way to make a big visual impact with minimal impact on the wallet.

The big project was in the dining room.  The floating candles idea was from Pinterest.  I purchased 24 LED tea lights from Amazon (about $12).  We covered toilet paper and wrapping paper rolls with cream-colored paper, glued a paper bottom on, and made a little sling across the top so the candle wouldn't fall in too far.  Some of the candles had wax drippings down the side made from the hot glue gun.

 We hung them up with clear nylon thread and white masking tape on the ceiling.  They were awesome, but took some time to put together, hang, turn on, and turn off...  overall it was worth it.  They were pretty magical.

We decorated the mantle a little... candles, books, bust statues, old paintings.  Okay, the paintings were already there.

We dipped pretzel rods in chocolate and decorated them to make wands.  Each kids made one.  We wrote named on the parchment so we knew who they belonged to.

Alli wanted a cake like the one Hagrid made for Harry.  She said pink frosting with green letters saying, "Happy Birthday Alli!"
 I guess Hagrid's cake was sloppy... oops.
Alli wanted a lemon cake.  I had a yellow cake mix, so I added a few drops of  food grade lemon essential oil.  Between the layers I put raspberry-peach preserves.  It was delicious.

It was hard to wait for the wands to harden.

They ate lunch with the lights out... candles only.  I made butter beer... it was melted butterscotch candies (about a dozen in a cup of water or so), a 2-liter of cream soda, and a 1-liter of seltzer water... topped with vanilla ice cream.

Then they played a tasting game.  I bought a small pack of Bertie Bott's Every Flavor Beans and a bigger pack of Target brand Jelly Belly beans.  The Bertie Bott's Beans are expensive and they include gross flavors.  I put the good jelly beans in a bigger bowl and the Bertie Bott's Beans in a smaller one, so the kids who were braver could try nasty flavors and the kids who were sensible could try pleasant flavors.

Alli had ten tall, skinny candles on her cake.

The gifts were opened...

I made chocolate frogs... after Christmas is a great time to buy melting chocolates.  These frogs were stuffed with marshmallows.  The candy mold cost about $5.  They were a hit.

We made golden snitches as a craft activity.  I purchased a bunch of golden Christmas ornaments (after Christmas 90% off!) and a bag of white feathers.  For $5, each girl got to make at least one... most made two.

Here is Alli's snitch... we hung it on clear nylon string.
 The goody bag included gold coins from Gringott's bank, a chocolate frog, jelly beans, the pretzel wand, and some mints (the coins, chocolate, and mints were all Christmas clearance finds).

So that was the party.  You can read more about it here.

Tuesday, August 27, 2013

Up-cycled purse

 I got a vintage Coach purse at a yard sale for 50 cents.  I loved that purse.  It was sturdy and big enough to tote all that stuff I need. It has served me well for two years or so.
Well, over the weekend, an entire water bottle was spilled in my purse. 
Sad day.
I set everything out to dry... check book, wallet, coupons (some of those got tossed)... and the purse was set by a sunny window.
It dried like this...
Um.  Not what I want my bag to look like.
I tried cleaning it.  No luck.
And so, inspired by my crafty friend Jill, I painted my purse.
To paint on leather (first of all, paint on something that you won't be crushed if it is ruined... lucky for me, my bag was already ruined... I had nothing to lose.) mix water and acrylic paint to a VERY thin consistency (about a 2:1 mix) and paint on with a large soft, flat brush. That is like a primer.  It softens the leather and opens the pores so the rest of the paint will soak in.  Next, mix a little more paint into the water/paint mixture and paint the bag again (1:1 paint/water).  And keep going with thin layers of paint until you get the look you were going for.  On my bag, the primer layer was a warm grayish tan, and with each layer I added more colors and some metallic paint. I also painted some of the final layers and rubbed some of the paint off with a rag. I used about nine different paints to get this color (cerulean blue, phalo green, yellow ochre, alizeran crimson, dioxazine purple, metallic silver, metallic gold, white, black).  Took me back to my color theory class in college.  :)

When I told my husband that I painted my purse, he was shocked.  "But that was a GOOD purse!" I know.  I was trying to salvage it.
(Mind you, whenever we see a home makeover show and someone paints over wood furniture, he cringes.  So I can see how that carried over to painted leather.)
But I think it turned out quite nice.

And I will carry this beauty for another several years.

Wednesday, December 12, 2012

Ikea shelf hack: American Girl Dollhouse

 Alli has an American Girl Doll.  Kit.
Ruby has a faux AG doll.  Kat. 
Alli has a bunch of Kit's stuff too.  She wasn't playing with it that much, and I was about to pack it up and put it in the basement, but then... inspiration!

We had an empty bookshelf that I was moving from the art room to the basement.  I took the shelves out and set the bookcase on its side to push it down the hall.  On its side, the bookcase made two little rooms that an AG doll could stand in.

The shelf was moved to the playroom, where the girls immediately set about to decorate it properly.  We set the loose shelves on the floor in front of the bookcase to make more floor space for the dolls. They colored pictures of windows and taped them in.  They found a jewelry box to be a dresser.  They expanded the house with other tables and blankets... hours of fun!


Wednesday, July 11, 2012

Angry Bird pajama party!

 I like our kids to be involved with the planning of their birthday parties.  When I asked Ruby what kind of party she would like, she said, "Angry Birds pajama party!"  I did not want to do a sleepover party.  And so we had a breakfast party with friends in jammies.
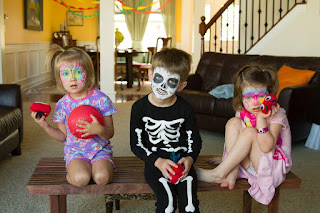
The first activity was to make Angry Bird bean bags.  I had made the basic red circle bean bags in advance, and the kids just hot glued (with adult assistance) the white patch, eyes, feathers, beak, and eyebrows onto the bean bags.

Then Grandma Utah painted faces.  She is a professional.  (If you live in Utah and you are throwing a party, call her.)

 Once everyone was done making their Angry Birds, we played the game.  The kids tossed their bean bags to knock the pig balls off of the boxes.  We played several rounds.
 The green balls were from the dollar store.  I painted pig faces on them.  Each kids got to take one home.

Then we had breakfast.  How about that Angry Bird fruit platter?!
 We served bacon and eggs (pigs and birds, get it?!) and fruit with the first course.

 Then we had waffles and ice cream.  Ruby did not want a cake, so we made waffles with cake batter.  Yum.  We did put candles in her ice cream.
Ruby had her face painted like a "rainbow tiger" which became quite popular.  Most of the kids looked like colorful tigers.
Then there was a pinata.  A pig, of course.

 Pinatas scare me... actually the child swinging a stick near a bunch of other kids scares me.  But it all worked out without injury.
The kids got goody bags to put the treats into.  And they took their pig balls.  And they went home happy.